Showing posts with label Graduation. Show all posts

April 14, 2018

Stuffs I Created This Week


Aloha All,

I am thinking of just posting on ONE DAY a week, with all the projects I created throughout the week. Would that be ok?? Let's try that out for now, huh?? I'm usually posting projects daily on my Facebook Group "Little C's Creations", and even behind the scene kinda stuffs, like in between projects... so, if you would like to follow me a lot closer, feel free to hope on to my group and request to be added there. :) 

Ok, so here are a bunch of stuffs that I worked on this week...

Created these graduation cards for the University of Hawaii students that are graduating this year. Yay, congratulations!!!

I used the following items:

  • Image: The Greeting Farm
  • Cardstock, Sentiments, Die Cut, Splashes and Bursts: Fun Stampers Journey


Then I worked on these 2 lei order, to complete this lei order of 3 leis with 50 bills each... this first lei is an open ended lei, which I also refer to as a "Maile Lei Money Lei". A close family friend of ours ordered these from me.  Thank You, Mika!! So very blessed to be able to make these for Logan!!


 This is the 3rd lei I made, this time adding some green and white cardstock for color of his school.


Then a crafty friend requested this Copic Colored image from The Greeting Farm. So very humbly blessed that she likes my coloring. The image is called "Adam Grad" and is in the digital image part of TGF's store. You can purchase any time, download immediately and then color to make on your project(s). These are the same images I used in the 1st pic of graduation cards. However, those are about 2" while this one is 3". So, I LOVE how digital images work, where I can resize to any size that I want. 

I also made this "Thank You" card for my friend that ordered the above image. Had to mail her the image in something stamped, right?? I also sent her some free goodies, I hope she will be able to use. I used My Favorite Things stamps on this card.


 I then created a card for my boy who is graduating in May. I colored him with a darker skinned colored, because he is a darker young man.

This is the inside....

Last but not least, DVD Envelopes for my parents and inlaws, of images and videos of my son's wedding. I used the We R Memory Makers Envelope Punch Board to make these 5" x 5" DVD Envelopes.


That's it for now! Thanks for stopping by!! Please let me know what you think about my once a week posting... if you like it or not?? Anyways, have a blessed rest of the week...

Aloha,
Jen


"Create in me a pure heart, O God, and renew a steadfast spirit within ME!!!" 
~Psalm 51:10~

April 6, 2018

4-Way Weaved Braided Ribbon Lei


Happy Aloha Friday!!!! Looking forward to the weekend?? I am.... not sure what my plans are, yet... oh wait, I'm hosting a Bible Journaling / Prayer Book / Crafty Session tomorrow!!! How could I have forgotten? Gee whiz.... it's a free session, where my ladies come and create with Jesus in mind. They are free to express themselves in creating in their own bible / prayer book / hymnal book, whatever they feel free to create in. A lot of mixed media and just some quiet time with Jesus. If you're one of the ladies coming over, looking forward in having to create with you. :) 

So today, I am sharing with you a 4-Way Weaved Braided Ribbon Lei of which was ordered from me, from my dear friend Gina. It's already in her possession, and I'm blessed that she asked me to create this project. She was the first one that introduced me to the weaving of this type of lei. And I've been so blessed to have been able to create so many of them. This time, I went for a 4-way weave... and learned it on my own. So blessed to have been able to make it for her. God is good!!! Thank You Gina, for your order. Congratulations and plenty of hugs n' prayers to your graduate.


This lei consists of 3 colors, black, white and orange.... so much fun to create. :) My son's graduation is coming up in May. Gonna have to make some for him. :)


Aloha,
Jen


"Create in me a pure heart, O God, and renew a steadfast spirit within ME!!!" 
~Psalm 51:10~

April 3, 2018

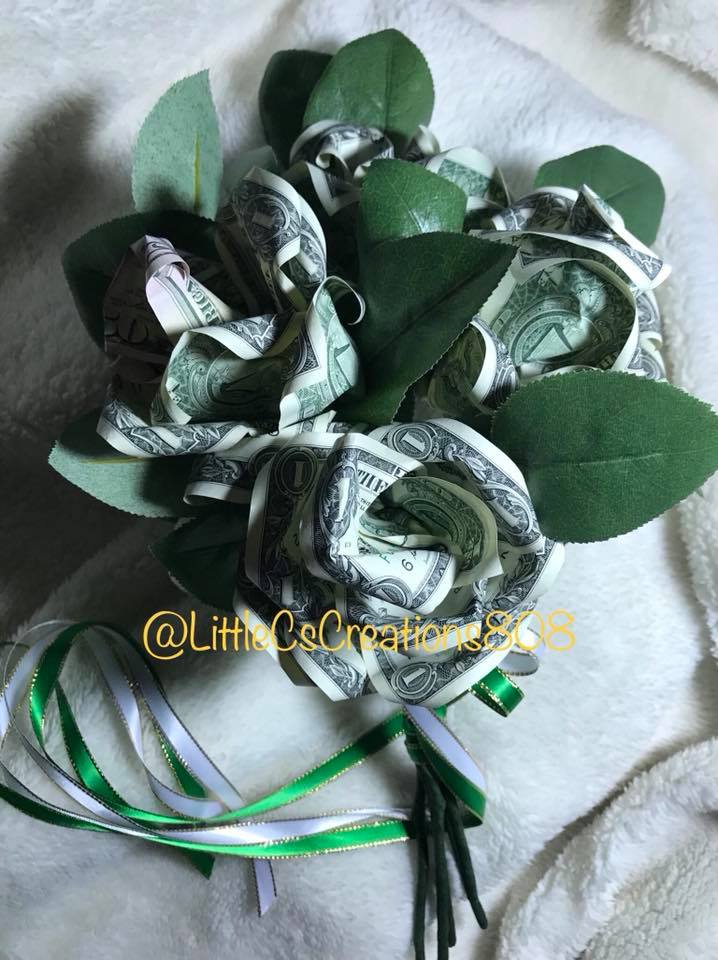
Money Rose Bouquet

Finished another order of a Rose Bouquet for graduation... 

$5 Each Rose or $25 for a Rose Bouquet of 5 Roses. It takes 5 bills (can be of any denomination) to make 1 rose. Therefore, total amount of funds given to me would be $5 for each rose requested, PLUS the amount of bills required to make each rose. Please go to the bank, and request CRISP bills, and contact me to coordinate pick up / delivery of funds. If you are not in a location that can meet personally, I can accept payments thru PAYPAL or CASH App. Completed roses will be shipped in a Large Priority Flat Rate Box. An add'l shipping rate of $17.95 will apply. However, if you are on the Island of Oahu, pick up place and time can be arranged. Typical turn around time is 1 week for 5 Roses. Please order 2-3 weeks PRIOR to when you need them.

To order please visit my online shop here: Little C's Creations Shop


Aloha,
Jen


"Create in me a pure heart, O God, and renew a steadfast spirit within ME!!!" 
~Psalm 51:10~

February 11, 2018

Video: Graduation Money Lei


It's that time of year again, where graduation lei orders are coming in, not just ANY graduation lei orders, but Graduation Money Lei orders!!! I have 3 more to work on, but this one was a RUSH order. Get this, this one is going to a Korean Pop Star in Korea!!! I met a new friend, through a mutual friend, and she was on her way to Korea. I made this lei during the weekend, and with my new long nails too!!! Below is a video of me creating the lei, I sped it up. It's fun to watch!! I love watching my fingers go to work on those dollars. Here is the finished lei!

Thanking the Lord for the talent and patience that HE has blessed me with to create these beauties.


Thanks for stopping by, I hope you've enjoyed this post!!!


Aloha,
Jen


"Create in me a pure heart, O God, and renew a steadfast spirit within ME!!!" 
~Psalm 51:10~

June 3, 2017

Graduation Leis 2017

Aloha Gang!!!

We are in full graduation season, and my hands were doing a lot of folding n' stringing, and making money leis for graduates across the seas, and throughout the islands. Here are the leis I made these past couple of weeks...

Made this for my girlfriend's stepson, graduated from a school on the mainland. It was so neat to hear all the great things that people were saying about this one kid having a money lei on. No one else had leis, and here he was, celebrating Hawaiian style. That's what I call, "Spreading the Aloha".


This one was made for my niece.....

This one was the 1st order of the season. LOVE LOVE LOVE the colors on this one.... so pretty with the purple.


My handmade products are available for order!! If you're interested in purchasing my handmade projects, you can stop by my online store here: Little C's Creative Things 

Thanks for stopping by!!!

May 18, 2017

Stampin' Up! Envelope Punch Board

Aloha All!!! With graduation season upon us, don't forget that you can use your Stampin' Up! Envelope Punch Board to create sweet n' simple money envelopes. The size I used for this is Card Size 3" x 6-1/2", Paper Size would be 7-7/8" x 7-7/8", and score line on 2-3/4". After punching out my envelope, I decorated with some die cuts, and sealed the envelope with double stick tape. Das it!! Sweet & Simple with Stampin' Up! :)

Thanks for stopping by!!


July 6, 2015

Graduation Fancy Z Fold Card

Aloha!! Created this "Z" fold card for my niece's graduation. Kept it elegant n' sweet. All products are Stampin' Up!


July 1, 2014

Saturated Canary Graduation Card

Here's another graduation creation.  Created this card for our cousin.  Size is 5-1/2" x 5-1/2".  I used a card base layout from MyScrapChick.com.  The image is from Saturated Canary.  I really enjoy coloring her images... but my favorite thing about her, is that I love that she loves the LORD!!!!


I created the "2014" on my eCal and cut with my eClips machine, using the "weld" feature to merge the numbers together.  I am finding that more n' more I am loving my eClips machine more than my Cricut.  Even though I've invested so much in my Cricut.  I will be thinking up ways to use my Cricut Machine more.  I tried it out this morning, and was NOT too happy with the results.  But it could've been because I was trying to cut a Hello Kitty image, and you know how that could be with all those tiny lil' pieces.  I will be posting that project in a couple of days.

Anyways, here are some of the challenges out there that I am submitting my project to:


That's all for now.... Thanks for stopping by!! Aloha!! OXOX

Blessings ~
Click here for more graphics and gifs!
"And now these three remain: faith, hope and love. But the greatest of these is love." ~1 Cor 13:13~  


May 28, 2014

Step By Step Tutorial of Graduation Nugget Cap Favors

Aloha!!!  I posted this to my Facebook... thought you would all like the step by step tutorial of this project as well... enjoy!!!

You will need:

- Hershey's Candy Nuggets
- Cardstock Strip of 3-1/2" x 1"
- 1-1/4" Square Punch (or cut squares at 1-1/4" x 1-1/4" if you do not have a punch).
- 4" of 1/8" Yellow Ribbon
- 1/8" Hole Punch
- Brads (w/prongs)
- Glue (I use Fabri-Tac for this project - Not Shown)
- Double Stick Tape (Not Shown)


Apply Double Stick Tape Adhesive to the entire one side of the 3-1/2" x 1" Strip of Cardstock


Wrap Nugget with strip of cardstock, starting point being the underneath of the nugget.


Continue to wrap entire nugget until it is completely wrapped around.


Take the 1-1/4" x 1-1/4" Square and use 1/8" hole punch to punch a hole in the middle. Use the points of the square edges to eyeball where the middle is.


Should look like this after punching a hole in the middle.


Fold the ribbon in half to make a "V" so that it is overlapping at the fold.


Use the 1/8" hole puncher to punch a hole near the fold of the ribbon.


Push the brad through the holes of the ribbon.


Now push the brad through the 1-1/4" Square - this creates the cap.


On the reverse side of the square cap, apply glue (I used Fabri-Tac)


Attached the square cap to top of the nugget... forming the entire graduation cap.


Project Complete!!!


Hope you enjoyed this tutorial!!!  Thanks for stopping by!!!  ALOHA!!!

Blessings ~
Click here for more graphics and gifs!
"And now these three remain: faith, hope and love. But the greatest of these is love." ~1 Cor 13:13~